Field Ready Design - Nebuliser

Device data
Manufacturing files https://www.youmagine.com/designs/nebuliser-connector
Hardware license CERN-OHL-S
Certifications Start OSHWA certification
Project data
Type
Authors Joey Fordahl
Status
Years 2016
Made Yes
Replicated No

Sunil works as a Biomedical Engineer at Grande International Hospital, Kathmandu. A piece of equipment that he repeatedly sees in the engineering department is the nebuliser compressor. A nebuliser works by using compressed air to convert liquid medicine to an aerosol that can be inhaled by the patient. However, the plastic connector which attaches the medication tube to the compressor keeps breaking [1]

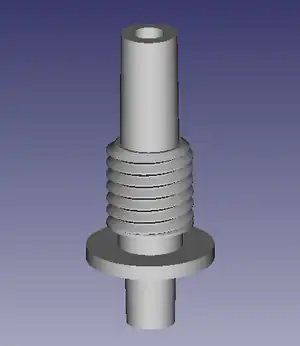
Once a new hole is drilled through the nebuliser's exterior using a 12 mm drill bit, my connector will slide into the hole and be fastened with a 3d-printed nut. My connector was designed using FreeCAD from the dimensions provided by the site. I used the threaded portion of an M12-1.75 bolt that I pulled from Mcmaster.com. The nut stl file is also from Mcmaster.

Bill of Materials

    1. Connector
    2. 3D-printed 12mm-1.75 flange nut (Mcmaster STEP file)

Tools needed

  1. MOST Delta RepRap or similar RepRap 3-D printer
  2. 1.75 mm PLA

Skills and knowledge needed

  • All you need is a 3D printer and slicing software for the STL's provided
  • If you would like to modify the design, you can download FreeCAD [2]

Technical Specifications and Assembly Instructions

  1. Both the connector and nut were printed in under 1 hour
  2. The connector file should be printed with Support Type: Touching Buildplate (60 degree overhang)
  3. Both files were printed at 0.1 mm layer height, but could be printed at.25 mm if desired.
Page data
Authors Joey Fordahl
License CC-BY-SA-3.0
Organizations Michigan_Tech's_Open_Sustainability_Technology_Lab, MTU, MY4777
Cite as Joey Fordahl (2016–2024). "Field Ready Design - Nebuliser". Appropedia. Retrieved November 28, 2025.